indesit my time washing machine manual

Indesit My Time Washing Machine Manual: A Comprehensive Guide

This manual details operation of your Indesit My Time washer, covering controls like the WASH CYCLE, SPIN SPEED, and TEMPERATURE knobs, plus the START/PAUSE function.

Understanding Your Indesit My Time Washer

Your Indesit My Time washing machine is designed for efficient and reliable laundry care. Familiarizing yourself with its components and functions will ensure optimal performance and longevity. This washer incorporates advanced features, indicated by the control panel’s buttons and indicator lights, allowing for customized wash cycles.

The machine’s operation revolves around selecting appropriate wash cycles, spin speeds, and temperatures based on fabric type and soil level. Understanding the detergent dispenser drawer’s compartments – for pre-wash detergent, main wash detergent, and fabric softener – is crucial for effective cleaning. The START/PAUSE and ON/OFF buttons control the washing process, while the delay timer offers convenient scheduling options. Regularly consulting this manual will help you maximize your washing experience.

Model Identification & Key Features

Identifying your specific Indesit My Time model is essential for accessing accurate support and replacement parts. Locate the model number on the machine’s rear panel or within the door jamb. Key features include a variety of wash cycles tailored to different fabric types – cotton, synthetics, delicates, and wool – alongside energy-saving Eco Wash programs.

The machine boasts adjustable spin speeds to minimize fabric damage and a convenient delay timer for scheduled washes. Indicator lights on the control panel clearly display the wash cycle progress and any error codes. The door lock function enhances safety during operation. These features combine to deliver a versatile and user-friendly laundry solution.

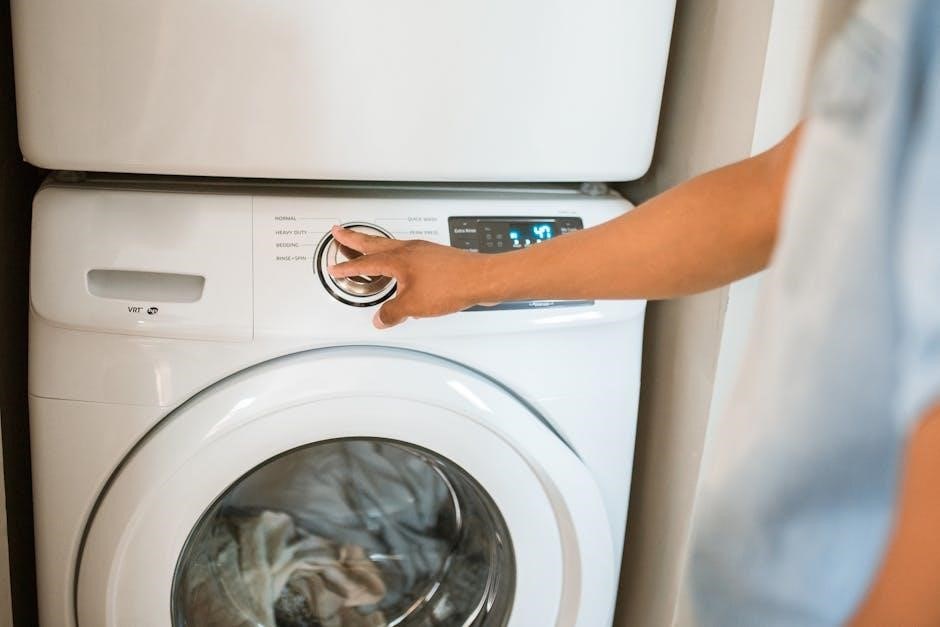
Control Panel Overview

The Indesit My Time control panel is intuitively designed for ease of use. Central to operation are the WASH CYCLE selection knob, allowing program choice, and the SPIN SPEED knob, controlling the final spin intensity. A TEMPERATURE setting knob adjusts the wash water temperature. The START/PAUSE button initiates or temporarily halts a cycle.

An ON/OFF button manages power, with a potential power-saving mode. The display panel utilizes indicator lights to signal cycle progress, door lock status, and any detected errors. Buttons with indicator lights provide clear feedback on selected settings, ensuring optimal control over each wash.

WASH CYCLE Selection Knob

The WASH CYCLE selection knob is the primary control for choosing the appropriate wash program for your laundry. Rotating this knob allows you to select from a variety of cycles, tailored to different fabric types and soil levels. Options typically include settings for cottons, synthetics, delicates, and woolens.

Carefully consider the fabric composition and care label instructions before selecting a cycle. Utilizing the correct program ensures effective cleaning while protecting your garments from damage. The knob’s clear markings and intuitive design simplify the selection process, offering a user-friendly experience.

SPIN SPEED Knob

The SPIN SPEED knob controls the intensity of the final spin cycle, directly impacting the moisture content remaining in your laundry. Lower spin speeds are gentler on delicate fabrics, minimizing wrinkles and preventing damage, but leave clothes wetter. Higher spin speeds extract more water, reducing drying time, but can cause increased wrinkling.

Adjusting the spin speed allows you to customize the wash cycle to suit different fabric types. Options are usually presented in revolutions per minute (RPM). Always check garment care labels for recommended spin speed limitations to avoid shrinking or stretching.

TEMPERATURE Setting Knob

The TEMPERATURE setting knob allows precise control over the water temperature used during the wash cycle. Selecting the appropriate temperature is crucial for effective cleaning and fabric care. Lower temperatures (cold or 30°C) are ideal for delicate items and preventing color fading, while higher temperatures (60°C or 90°C) are best for heavily soiled laundry and sanitizing.

Refer to garment care labels for temperature recommendations. Using excessively high temperatures can damage certain fabrics, causing shrinkage or color loss. The knob typically offers options ranging from cold wash to a high-temperature sanitize cycle.

START/PAUSE Button Functionality

The START/PAUSE button is central to operating your Indesit My Time washing machine. Pressing this button initiates the selected wash cycle, bringing the machine to life. During operation, a single press on the START/PAUSE button will temporarily halt the cycle – a useful feature for adding forgotten items.

Pressing the button again resumes the cycle from where it left off. The indicator light associated with this button illuminates when the machine is actively running. If an error occurs, the machine will pause, and the indicator light may flash, signaling a problem requiring attention. Always ensure the door is securely locked before starting a cycle.

ON/OFF Button & Power Saving Mode

The ON/OFF button controls the main power supply to your Indesit My Time washing machine. Pressing this button completely shuts down the appliance, disconnecting it from the electrical outlet – crucial for safety during maintenance or extended periods of non-use. Some models incorporate a power-saving mode.

This mode activates automatically after a period of inactivity, reducing energy consumption. It minimizes standby power usage, contributing to lower electricity bills and a smaller environmental footprint. The display panel will typically indicate when power-saving mode is active. Remember to fully switch off the machine before cleaning or performing any repairs.

Display Panel Indicators

The Indesit My Time washing machine’s display panel utilizes indicator lights to communicate the machine’s status. A “DOOR LOCKED” indicator illuminates when the door is securely fastened, preventing accidental opening during operation. The “PROGRESS” indicator shows the current stage of the wash cycle, providing a visual timeline.

Additional lights signal selected options like temperature or spin speed. Error codes, if any, will also appear on the display, assisting in troubleshooting. Familiarize yourself with these indicators to understand the machine’s operation and quickly identify potential issues. Refer to the troubleshooting section for error code definitions.

Detergent Dispenser Drawer

The Indesit My Time washing machine features a multi-compartment detergent dispenser drawer, crucial for optimal wash results. This drawer is typically located on the control panel. It’s divided into sections for pre-wash detergent, main wash detergent, and fabric softener.

Always use the correct type of detergent for each compartment, following the detergent manufacturer’s instructions. Compartment 1 is for pre-wash detergent, used for heavily soiled items. Compartment 2 accepts the main wash detergent. Finally, Compartment 3 is dedicated to fabric softener, releasing it during the final rinse cycle for softer clothes.

Compartment 1: Pre-Wash Detergent

Compartment 1 within the Indesit My Time detergent dispenser is specifically designated for pre-wash detergent. This compartment is utilized when you select a wash cycle that includes a pre-wash phase, ideal for garments with significant dirt or staining. Using pre-wash detergent helps loosen stubborn soils before the main wash cycle begins, enhancing cleaning performance.

Only add pre-wash detergent if the selected program includes a pre-wash option. Overusing detergent can lead to residue buildup and reduced washing efficiency. Refer to your detergent packaging for appropriate dosage levels for pre-wash applications. Ensure the compartment is not overfilled.

Compartment 2: Main Wash Detergent

Compartment 2 of the Indesit My Time washing machine’s dispenser is dedicated to the main wash detergent. This is where you add detergent for the primary cleaning phase of every wash cycle, unless a pre-wash cycle is also selected. The amount of detergent needed depends on the load size, water hardness, and the level of soiling of your laundry.

Always follow the detergent manufacturer’s instructions for dosage. Using too much detergent won’t necessarily result in cleaner clothes and can leave residue. Liquid or powder detergent can be used in this compartment. Ensure the compartment is easily accessible for convenient detergent addition before each wash.

Compartment 3: Fabric Softener

Compartment 3 in the Indesit My Time washing machine’s detergent dispenser is specifically designed for fabric softener. This compartment releases the softener during the final rinse cycle, leaving your clothes feeling softer and reducing static cling. It’s crucial not to overfill this compartment, as concentrated fabric softener can cause staining or leave a residue on your garments.

Always dilute fabric softener with water according to the manufacturer’s instructions before pouring it into this compartment. Avoid direct contact of undiluted softener with fabrics. The maximum fill line is clearly marked within the compartment – do not exceed it.

Wash Cycle Programs

The Indesit My Time washing machine offers a variety of wash cycle programs tailored to different fabric types and soiling levels. These include programs for Cotton, Synthetics, Delicates/Wool, and a Quick Wash option for lightly soiled items needing a fast refresh. An Eco Wash program prioritizes energy efficiency, using lower temperatures and optimized wash cycles.

Selecting the appropriate program ensures optimal cleaning performance and protects your clothes. Refer to the garment care labels for guidance. The machine’s control panel allows easy selection of the desired program, adjusting wash duration and intensity to suit your laundry needs.

Cotton Wash Program Details

The Cotton Wash program is designed for robust, everyday cotton items like t-shirts, underwear, and bed linen. It utilizes a more vigorous wash action and higher temperatures – typically ranging from 40°C to 90°C – to effectively remove dirt and stains. This program is ideal for heavily soiled cottons, ensuring thorough cleaning.

Users can often adjust the intensity of the Cotton Wash, selecting options for pre-wash or extra rinse cycles. Always check garment care labels before using high temperatures, as some cotton items may shrink or fade. This program provides a reliable and efficient clean for your cotton laundry.

Synthetics Wash Program Details

The Synthetics Wash program caters to fabrics like polyester, nylon, acrylics, and blends. It employs a gentler wash action and lower temperatures – typically between 30°C and 60°C – to protect these materials from damage. This program prevents shrinking, stretching, and color fading commonly associated with synthetic fibers.

Adjustable settings often include spin speed reduction for delicate synthetics. It’s crucial to consult garment care labels, as some synthetics require specific washing instructions. Utilizing the Synthetics program ensures your synthetic clothing remains in excellent condition, maintaining its shape, color, and overall quality through careful cleaning.

Delicate/Wool Wash Program Details

The Delicate/Wool Wash program is specifically designed for items requiring extra care, such as silk, lace, and wool garments. This cycle utilizes a very gentle wash action with minimal agitation to prevent stretching, shrinking, or damage to delicate fibers. Water temperatures are kept consistently low, typically around 30°C, to safeguard fabric integrity.

A reduced spin speed is automatically selected to minimize creasing and distortion. Always check garment care labels before using this program, and consider using a specialized wool or delicate detergent. Proper use of this cycle extends the lifespan of your most treasured, fragile clothing items.

Quick Wash Program – Time Saving Options

The Quick Wash program offers a convenient solution for lightly soiled laundry, providing a full wash cycle in a significantly reduced timeframe – typically under 30 minutes. This program is ideal for refreshing clothes that haven’t accumulated heavy dirt or stains. It utilizes a higher water flow rate and optimized wash actions to achieve effective cleaning in less time.

While efficient, remember that the Quick Wash cycle may not be suitable for heavily soiled items or those requiring intensive cleaning. Select this option when time is of the essence and your laundry doesn’t demand a full-length wash cycle.

Eco Wash Program – Energy Efficiency

The Eco Wash program is specifically designed to minimize energy and water consumption, making it an environmentally responsible choice for your laundry needs. This cycle operates at a lower temperature, typically around 20°C or 30°C, and utilizes optimized wash actions to deliver effective cleaning results while reducing your carbon footprint.

Although the Eco Wash cycle may have a longer duration compared to other programs, the significant savings in energy and water make it a sustainable option. It’s best suited for normally soiled laundry and contributes to lower utility bills and a greener lifestyle.

Delay Timer Function

The Indesit My Time washing machine features a convenient Delay Timer function, allowing you to schedule wash cycles to start at a later, more convenient time. This is particularly useful for taking advantage of off-peak electricity rates or ensuring laundry is finished when you’re home. The delay timer can be set in increments, typically ranging from 1 to 24 hours, providing flexibility to suit your schedule.

Using the delay timer allows you to pre-load the machine with detergent and laundry, then set the timer to begin the wash cycle automatically at your desired time, offering enhanced convenience and control over your laundry routine.

Using the Wash Cycle Delay Timer

To utilize the Delay Timer, first select your desired wash cycle, temperature, and spin speed. Then, press the DELAY TIMER button repeatedly to set the desired delay duration, typically displayed on the function display. Each press increases the delay time, usually in hourly increments. Ensure the START/PAUSE button isn’t illuminated before setting the delay.

Once the delay time is set, press the START/PAUSE button. The indicator light for the delay timer will illuminate, confirming activation. The machine will automatically begin the wash cycle after the specified delay period. Remember to check the detergent dispenser drawer is correctly loaded before initiating the delayed start.

Safety Precautions & Warnings

Always ensure the washing machine is properly grounded for electrical safety. Never attempt to repair the appliance yourself; contact qualified service personnel. Keep children away from the machine during operation, utilizing the child lock feature if available to prevent accidental program changes.

Avoid overloading the drum, as this can damage the machine and reduce washing efficiency. Do not wash items that have been exposed to flammable liquids. Regularly check the power cord for damage and never operate the machine if it’s compromised. Disconnect the appliance from the power supply before cleaning or maintenance.

Electrical Safety Guidelines

Prioritize electrical safety when using your Indesit My Time washing machine. Ensure the voltage supplied matches the appliance’s rating label. Never operate the machine with a damaged power cord or plug; replace immediately. Avoid using extension cords or multi-plugs, as they can overload the circuit.

The appliance must be properly grounded to prevent electric shock; Do not touch the power cord or appliance with wet hands. Disconnect the machine from the power supply before cleaning, maintenance, or during thunderstorms. If the machine malfunctions electrically, immediately disconnect it and contact a qualified technician for repair.

Child Lock Feature (If Applicable)

Certain Indesit My Time washing machine models feature a child lock function, enhancing safety by preventing unintended operation. This feature typically involves pressing and holding specific buttons simultaneously – consult your model’s specific instructions for the correct combination.

When activated, the child lock disables the control panel buttons, preventing changes to the wash cycle or settings. To deactivate, repeat the button combination; Always ensure the child lock is disengaged when you intend to use the machine. This feature is crucial in households with young children, minimizing risks associated with accidental appliance activation.

Avoiding Overloading the Machine

To ensure optimal performance and longevity of your Indesit My Time washing machine, avoid overloading the drum. Overloading restricts garment movement, hindering effective cleaning and potentially damaging the machine’s components. Refer to your machine’s specifications for the maximum load capacity, typically measured in kilograms.

Distribute items evenly within the drum to maintain balance during the spin cycle. Uneven loads can cause excessive vibration and noise, potentially leading to damage. Always leave sufficient space for clothes to move freely. Respecting the load limits preserves the machine’s efficiency and prevents unnecessary wear and tear.

Troubleshooting Common Issues

Encountering problems with your Indesit My Time washer? This section addresses frequent concerns. If the machine doesn’t start, verify the power supply and ensure the door is securely closed. Drainage issues often stem from a blocked filter – regular cleaning is crucial. Error codes displayed on the panel indicate specific faults; consult the full manual for interpretations.

A door lock malfunction might prevent cycles from initiating. If this occurs, try restarting the machine. Always disconnect the power before attempting any internal checks. For persistent issues, contacting a qualified technician is recommended to avoid further damage or safety hazards.

Machine Not Starting

If your Indesit My Time washing machine fails to start, begin with the simplest checks. Confirm the power cord is firmly plugged into a working outlet. Verify the door is completely closed and latched; the machine won’t operate if the door isn’t secured. Check your home’s circuit breaker or fuse box to ensure the circuit hasn’t tripped or blown.

Also, ensure the START/PAUSE button has been properly pressed after selecting a wash cycle. If these steps don’t resolve the issue, there might be an internal fault requiring professional attention. Do not attempt to disassemble the machine yourself.

Drainage Problems & Error Codes

Drainage issues with your Indesit My Time washer often manifest as standing water in the drum. First, check the drain hose for kinks or obstructions. Ensure the hose isn’t inserted too far into the drainpipe, which can cause siphoning. A clogged drain filter is a common culprit; refer to the ‘Filter Cleaning Procedure’ section for instructions.

Error codes displayed on the machine’s panel indicate specific problems. Consult the full manual (available on ManualsLib) for a comprehensive list and their meanings. Common codes relate to drainage faults or issues with the water inlet. Note the code before contacting support.

Door Lock Malfunction

If the door of your Indesit My Time washing machine won’t unlock after a cycle, a malfunction in the door lock mechanism is likely. The machine prioritizes safety, preventing opening during operation. Do not force the door open, as this could cause damage. First, ensure the machine is completely powered off and unplugged from the electrical outlet.

Sometimes, simply restarting the machine can reset the lock. If the problem persists, a faulty door lock switch or wiring may require professional attention. Refer to the machine’s display for any error codes related to the door lock, and consult the full manual for troubleshooting guidance.

Cleaning & Maintenance

Regular cleaning ensures optimal performance and longevity of your Indesit My Time washing machine. Begin by cleaning the detergent dispenser drawer frequently to prevent residue buildup, which can affect wash results. Wipe down the drum and rubber seal after each wash to remove moisture and prevent mold growth.

Crucially, the filter requires periodic cleaning to remove lint and debris. Consult your manual for the filter’s location and cleaning procedure. A clean filter ensures proper drainage. Avoid harsh chemicals; use a damp cloth and mild detergent for all surfaces. Consistent maintenance prevents issues and keeps your machine running efficiently.

Cleaning the Detergent Dispenser

To clean the detergent dispenser, first, remove it from the washing machine – usually by pressing a release button or lever. Rinse each compartment (pre-wash, main wash, and fabric softener) thoroughly under warm running water to dissolve any accumulated detergent or softener residue. Use a small brush, like an old toothbrush, to scrub away stubborn deposits.

Ensure all traces of detergent are removed, as buildup can cause blockages and affect wash performance. Once clean, dry the dispenser completely before reinserting it into the machine. Regular cleaning, ideally monthly, prevents issues and maintains optimal detergent distribution.

Cleaning the Drum & Rubber Seal

Regularly cleaning the drum and rubber seal prevents mold and mildew growth, ensuring fresh laundry. Run an empty hot wash cycle with a washing machine cleaner or a cup of white vinegar monthly. After the cycle, wipe down the drum’s interior with a clean, damp cloth.

Pay close attention to the rubber seal around the door; this area traps moisture and debris. Carefully inspect the folds for any visible mold or residue. Use a diluted bleach solution (follow product instructions) or a specialized rubber cleaner to disinfect the seal, then wipe dry.

Filter Cleaning Procedure

The filter prevents debris from clogging the drain pump. Locate the filter access panel, usually at the bottom front of the machine. Have a shallow container and towels ready to catch any spilled water. Carefully open the panel and unscrew the filter cap – water will drain out.

Remove any lint, coins, buttons, or other objects from the filter. Rinse the filter thoroughly under running water, ensuring all debris is removed. Inspect the filter housing for obstructions. Reinsert the cleaned filter, securely tightening the cap to prevent leaks. Close the access panel.

Technical Specifications

This Indesit My Time washing machine operates on a standard 220-240V AC power supply, with a typical power consumption varying based on the selected wash cycle. Maximum wash load capacity ranges depending on the program, generally between 5 to 9 kilograms. Spin speeds are adjustable, reaching up to 1400 RPM for efficient water extraction.

Dimensions are approximately 85cm (height) x 60cm (width) x 59.5cm (depth). Water inlet pressure should be between 0.1 and 1.0 MPa. The machine’s energy efficiency class is typically rated ‘A’ or higher, promoting responsible energy usage. Please refer to the product label for precise details.

ideal logic combi boiler manual

Welcome to the Ideal Logic Combi Boiler Manual. This guide provides essential information for installing‚ operating‚ and maintaining your boiler efficiently. Ensure optimal performance and energy savings.

1.1 What is the Ideal Logic Combi Boiler?

The Ideal Logic Combi Boiler is a highly efficient‚ compact heating solution designed for modern homes. It combines central heating and hot water in one unit‚ offering A-rated energy efficiency and reliable performance. Known for its user-friendly controls and space-saving design‚ it’s a popular choice for homeowners seeking a cost-effective and environmentally friendly heating system. With a rated heat output of 25 kW‚ it ensures consistent heating while minimizing energy consumption‚ making it an excellent option for various household needs.

1.2 Importance of the Manual for Users

This manual is crucial for users to understand and optimize their Ideal Logic Combi Boiler. It provides detailed instructions for installation‚ operation‚ and maintenance‚ ensuring safety and efficiency. By following the guidelines‚ users can troubleshoot common issues‚ adjust settings‚ and perform routine checks like bleeding radiators and checking boiler pressure. Regular servicing and proper usage extend the boiler’s lifespan and maintain its A-rated efficiency‚ saving energy and reducing costs. Referencing the manual helps users maximize their boiler’s performance and enjoy long-term reliability.

Key Features of the Ideal Logic Combi Boiler

The Ideal Logic Combi Boiler offers high efficiency‚ compact design‚ and reliable performance. It includes advanced controls‚ low emissions‚ and compatibility with OpenTherm interfaces for smart operation.

2.1 Energy Efficiency and A-Rating

The Ideal Logic Combi Boiler boasts an A-Rating for energy efficiency‚ ensuring minimal energy waste. With a high ERP rating‚ it meets EU standards‚ reducing fuel consumption and lowering energy bills. Its advanced technology optimizes heat production‚ making it eco-friendly. This feature not only benefits the environment but also enhances cost savings for homeowners. By maintaining high efficiency‚ the boiler provides consistent performance while being environmentally responsible.

2.2 Heat Output and Performance

The Ideal Logic Combi Boiler delivers reliable heat output‚ ensuring consistent warmth and hot water. With a rated heat output of 25 kW‚ it efficiently meets household demands. Its high modulation ratio allows precise temperature control‚ optimizing performance. The boiler excels in both heating and water heating tasks‚ providing steady pressure and flow. Advanced engineering ensures minimal energy loss‚ maintaining high efficiency. This balance of power and precision makes it ideal for various home sizes‚ guaranteeing comfort and reliability year-round.

2.3 Compact Design and Space-Saving

The Ideal Logic Combi Boiler features a compact‚ lightweight design‚ making it perfect for small spaces. Its slim dimensions allow easy installation in kitchens‚ utility rooms‚ or even recesses. Wall-mounting capability further maximizes space efficiency. Despite its compact size‚ the boiler delivers powerful performance‚ ensuring reliable heating and hot water. This space-saving design makes it ideal for modern homes with limited room‚ offering convenience without compromising on functionality or efficiency.

Installation Requirements

The Ideal Logic Combi Boiler requires a compatible heating system‚ adequate space for installation‚ and adherence to safety guidelines to ensure proper functioning and efficiency.

3.1 System Compatibility and Requirements

The Ideal Logic Combi Boiler is designed to work with standard heating systems‚ including radiators and underfloor heating. It is compatible with OpenTherm interfaces‚ enhancing temperature control. Proper installation requires a qualified Gas Safe engineer to ensure safety and efficiency. Annual servicing is recommended to maintain performance and warranty validity. The boiler must be installed in a well-ventilated area‚ adhering to all safety guidelines and manufacturer specifications for optimal functionality and energy savings.

3.2 Step-by-Step Installation Guide

  • Ensure the area is prepared‚ with clear access and necessary tools ready.
  • Connect the water and gas pipes according to the manufacturer’s instructions.
  • Install the flue system‚ ensuring proper ventilation and compliance with safety standards.
  • Fill the boiler with water via the manual fill valve until the pressure reaches 1-1.5 bar.
  • Test the system for leaks and proper function before handing over to the user.
  • Ensure all electrical connections are secure and meet safety regulations.

3.3 Safety Precautions During Installation

Always follow safety guidelines to ensure a secure installation process.

  • Turn off the electricity and gas supply before starting any work.
  • Ensure proper ventilation in the room to prevent carbon monoxide buildup.
  • Wear protective gear‚ including gloves and safety glasses.
  • Avoid over-tightening connections to prevent damage to pipes or components.
  • Keep the area clear of flammable materials and sparks.
  • Follow the manufacturer’s instructions for electrical connections.
  • Ensure all joints and seals are secure to prevent leaks.

Operating the Ideal Logic Combi Boiler

Learn how to operate your Ideal Logic Combi Boiler efficiently. Understand the controls‚ adjust settings‚ and manage daily operations for optimal heating and hot water performance.

4.1 Daily Operation and Controls

Daily operation of the Ideal Logic Combi Boiler involves simple steps to ensure efficiency. Check the boiler pressure regularly‚ bleed radiators if necessary‚ and monitor temperature controls. Adjust settings via the control panel to maintain desired heating and hot water levels. Ensure the system is balanced for optimal performance. Refer to the manual for guidance on using the controls effectively and safely. Proper daily management enhances energy efficiency and prolongs boiler lifespan.

4.2 Adjusting Boiler Settings

Adjusting the boiler settings on your Ideal Logic Combi Boiler is straightforward. Use the control panel to set desired temperatures for heating and hot water. Ensure the system is balanced by checking and adjusting radiator valves as needed. For energy efficiency‚ lower the temperature when the property is unoccupied. Regularly review and update settings to match your usage patterns. Refer to the manual for detailed guidance on optimizing settings for comfort and energy savings. Annual servicing ensures settings remain accurate and efficient.

4.3 Understanding Error Codes

Your Ideal Logic Combi Boiler may display error codes to indicate specific issues. Codes like “LOW PRESSURE” or “LEAK DETECTED” signal common problems. Refer to the manual for a full list of codes and their meanings. Addressing errors promptly ensures optimal performance and prevents further damage. For example‚ low pressure can be resolved by refilling the system‚ while leaks require immediate attention. Always follow the manual’s guidance or consult a qualified engineer for complex issues to maintain efficiency and safety. Regular checks can help prevent errors from occurring.

Maintenance and Servicing

Regular maintenance ensures your Ideal Logic Combi Boiler operates efficiently. Schedule annual servicing‚ check pressure‚ bleed radiators‚ and clear debris to maintain optimal performance and prevent issues.

5.1 Annual Servicing Recommendations

Annual servicing is crucial for maintaining your Ideal Logic Combi Boiler’s efficiency and longevity. A qualified engineer should inspect and clean internal components‚ check for leaks‚ and ensure all safety features are functioning correctly. This service also involves verifying gas pressures‚ testing the flue‚ and replacing worn-out parts if necessary. Regular servicing not only prevents unexpected breakdowns but also ensures compliance with manufacturer warranties and safety standards‚ keeping your heating system reliable and efficient year-round.

5.2 Checking Boiler Pressure

Regularly checking the boiler pressure is essential for optimal performance. The ideal pressure range is between 1 and 2 bar. To check‚ switch off the boiler‚ locate the pressure gauge‚ and ensure the needle is within the green zone. If the pressure is too low‚ use the manual fill valve to add water. Open the mains tap slowly until the pressure stabilizes. Avoid over-pressurizing‚ as this can damage the system. Refer to the manual for specific instructions to maintain the recommended pressure levels and ensure safe operation.

5.3 Bleeding Radiators

Bleeding radiators is crucial for maintaining efficient heating. To bleed‚ turn off the boiler and allow it to cool. Use a radiator key to open the bleed valve until water starts to flow. Close the valve immediately to avoid air entering the system. Repeat for all radiators as needed. This process ensures optimal heat distribution and prevents cold spots. Regular bleeding‚ at least once a year‚ keeps the system balanced and running efficiently. Always follow safety precautions to avoid scalding from hot water.

Technical Specifications

The Ideal Logic Combi Boiler features a rated heat output of 25 kW and an A energy efficiency rating. It supports OpenTherm interfaces for advanced control systems‚ ensuring optimal performance and compatibility with modern heating solutions.

6.1 Rated Heat Output and Efficiency

The Ideal Logic Combi Boiler boasts a rated heat output of 25 kW‚ ensuring reliable heating performance. Its A energy efficiency rating minimizes energy consumption‚ lowering utility bills. Designed with advanced technology‚ it maintains high efficiency across various operating conditions. The boiler’s compact design and intelligent controls further enhance its energy-saving capabilities‚ making it an eco-friendly choice for modern homes. This combination of power and efficiency ensures consistent warmth while reducing environmental impact and operational costs over time.

6.2 Water Pressure and Flow Rate

The Ideal Logic Combi Boiler operates optimally at a water pressure range of 1 to 2 bar. Proper pressure ensures efficient heating and hot water delivery. The flow rate is tailored to meet household demands‚ providing consistent warmth and water supply. Maintaining correct pressure is crucial to prevent system issues. Annual servicing and regular checks help sustain ideal performance‚ ensuring energy efficiency and reliability. Always refer to the manual for guidance on pressure adjustments and flow rate optimization.

6.3 Compatibility with OpenTherm Interfaces

The Ideal Logic Combi Boiler is compatible with OpenTherm interfaces‚ enabling seamless integration with smart thermostats. This compatibility allows for advanced temperature control and energy efficiency. Models such as the E-Tec S‚ E-tec Plus‚ and Evoke are supported‚ ensuring optimal performance. OpenTherm technology enhances heating precision‚ reducing energy waste. For proper setup‚ consult the manual and ensure your system is configured correctly. This feature is designed to improve comfort and lower energy bills‚ making it a valuable addition to your heating system.

Energy Efficiency and Cost Savings

The Ideal Logic Combi Boiler’s A-rated efficiency ensures significant energy savings. Its advanced design reduces fuel consumption‚ lowering bills and environmental impact while maintaining optimal performance.

7.1 Energy-Saving Features

The Ideal Logic Combi Boiler features advanced energy-saving technologies‚ including an A-rated efficiency rating and smart controls. These features minimize fuel consumption while maintaining consistent heating performance. The boiler’s modulation ensures it only uses the energy required‚ reducing waste. Additionally‚ its compact design allows for optimal heat distribution‚ further enhancing energy efficiency. Regular servicing and proper maintenance‚ as outlined in the manual‚ are crucial to sustaining these energy-saving benefits over time.

7.2 Reducing Energy Consumption

To reduce energy consumption with your Ideal Logic Combi Boiler‚ adjust settings to avoid overheating and ensure the system operates within optimal ranges. Use the manual fill to maintain correct pressure‚ as low pressure can decrease efficiency. Regularly check and balance radiators to prevent uneven heating. Additionally‚ inspect for leaks and insulate pipes to minimize heat loss. By following these steps and the manual’s guidelines‚ you can significantly lower energy usage while maintaining comfort and performance.

7.3 Long-Term Cost Benefits

Investing in the Ideal Logic Combi Boiler offers substantial long-term cost benefits. Its A-rated energy efficiency reduces heating bills by minimizing energy waste. Regular maintenance‚ such as annual servicing and radiator bleeding‚ ensures optimal performance and extends the boiler’s lifespan. Proper system balancing and addressing leaks promptly prevent unnecessary repairs and energy losses. Over time‚ these savings accumulate‚ making the boiler a cost-effective choice for homeowners seeking both comfort and financial efficiency.

Troubleshooting Common Issues

Troubleshooting your Ideal Logic Combi Boiler involves identifying common problems like low pressure‚ leaks‚ or error codes. Refer to the manual for specific solutions.

Regular checks and annual servicing can prevent many issues. Addressing faults promptly ensures reliability and efficiency‚ minimizing downtime and repair costs over time.

8.1 Identifying Common Problems

Common issues with the Ideal Logic Combi Boiler include error codes‚ low pressure‚ and leaks. Error codes like “LO” or “A1” indicate specific faults. Low pressure often results from water loss‚ while leaks may stem from faulty gaskets or corroded pipework. Strange noises‚ such as banging or whistling‚ can signal lime scale buildup or faulty components. Regular checks and annual servicing help identify these issues early‚ preventing major breakdowns. Always refer to the manual for detailed troubleshooting guidance.

8.2 Solutions for Low Pressure

If your Ideal Logic Combi Boiler has low pressure‚ start by refilling the system using the manual fill valve located beneath the boiler. Ensure the water mains tap is open and fill until the pressure gauge reaches the recommended level (typically 1-2 bar). If pressure drops repeatedly‚ check for leaks in pipework or gaskets. Bleeding radiators can also help restore balance. Always turn off the boiler before attempting repairs and consult a Gas Safe engineer if issues persist. Regular servicing prevents such problems.

8.3 Addressing Leaks and Faulty Parts

If you notice leaks or faulty parts in your Ideal Logic Combi Boiler‚ identify the source immediately. Turn off the boiler and water supply. Inspect the flue manifold‚ sump cover gasket‚ or pipework for damage. Replace any faulty components using genuine Ideal Logic spares for compatibility and safety. For complex issues‚ contact a Gas Safe engineer. Regular servicing can prevent such problems. Always follow safety guidelines to avoid further damage or hazards‚ ensuring your boiler operates efficiently and safely.

The Ideal Logic Combi Boiler Manual provides comprehensive guidance for optimal performance. Regular servicing‚ pressure checks‚ and radiator bleeding ensure efficiency and longevity. Follow these steps for reliable heating and cost savings.

9.1 Summary of Key Points

The Ideal Logic Combi Boiler Manual emphasizes the importance of regular servicing‚ checking boiler pressure‚ and bleeding radiators annually. It highlights energy efficiency‚ compact design‚ and reliable performance. Proper installation‚ daily operation‚ and troubleshooting are covered to ensure optimal functionality. The manual also underscores compatibility with OpenTherm interfaces and the need for annual maintenance to maintain efficiency. By following these guidelines‚ users can enjoy consistent heating‚ reduce energy consumption‚ and extend the boiler’s lifespan while adhering to safety standards.

9.2 Final Tips for Optimal Performance

For optimal performance‚ ensure annual servicing and maintain proper boiler pressure. Regularly bleed radiators to keep the system balanced and efficient. Explore energy-saving features to reduce consumption and costs. Always refer to the manual for specific guidance on adjustments and troubleshooting. Keep the system clean and well-maintained to extend its lifespan. By following these tips‚ you can enjoy reliable‚ efficient heating and hot water while minimizing energy waste and ensuring safety. Stay informed about updates and best practices for your Ideal Logic Combi Boiler.

mens t shirt size guide

Understanding the Importance of Correct Sizing

Correct sizing is crucial when it comes to mens t shirts as it affects the overall fit and comfort of the garment. A well-fitting t shirt can enhance the wearer’s appearance and confidence. On the other hand‚ an ill-fitting t shirt can be unflattering and uncomfortable. Understanding the importance of correct sizing is essential to make informed purchasing decisions. It involves considering various factors such as body measurements‚ garment measurements‚ and personal preferences. By taking the time to understand the importance of correct sizing‚ individuals can avoid common pitfalls such as ordering the wrong size or style. This knowledge can also help individuals to navigate the often confusing world of mens t shirt sizing with ease and confidence‚ ultimately leading to a more satisfying shopping experience and a wardrobe that fits well and looks great. Proper sizing is key to a great fit.

Mens T Shirt Size Charts

Mens t shirt size charts provide detailed measurements and sizes for various styles and brands of t shirts easily online using tables and graphs for comparison purposes only.

Measuring Your Body for the Perfect Fit

To ensure a perfect fit‚ measuring your body is crucial when using a mens t shirt size guide.
The measurements required include chest and waist circumference‚ as well as shoulder and sleeve length.
These measurements can be taken using a flexible tape measure‚ ensuring it is level and parallel to the floor.
It is also important to stand up straight and relax while taking the measurements to get an accurate reading.
The chest measurement is taken around the fullest part of the chest‚ typically just under the armpits.
The waist measurement is taken around the narrowest part of the natural waistline.
By taking these measurements‚ you can determine your ideal t shirt size and style‚ whether it be classic fit‚ pro-fit‚ or tall fit.
Using these measurements‚ you can then compare them to the size charts provided by different brands to find the perfect fit.
This will help you make an informed purchase decision and avoid returns or exchanges due to incorrect sizing.
The key to a perfect fit is accurate measurements and comparing them to the size charts provided.
By doing so‚ you can enjoy a comfortable and stylish t shirt that fits well and meets your needs.

How to Measure Your T Shirt

Measure t shirt width and length to determine size using garment measurements easily online.

Using Garment Measurements to Determine Size

To determine the size of a mens t shirt‚ garment measurements can be used. This involves measuring the width and length of the t shirt. The width is measured from one edge to the other‚ while the length is measured from the top of the t shirt to the bottom. These measurements can then be compared to a size chart to determine the corresponding size. Using garment measurements to determine size is a useful method‚ especially when trying to find the perfect fit. It is also important to note that different brands may have slightly different measurements‚ so it is always a good idea to check the size chart for the specific brand. By using garment measurements‚ individuals can ensure that they are getting the right size for their mens t shirt. This method is easy to use and provides accurate results.

Comparing Classic Fit vs Pro-Fit and Tall Fit Styles

Classic fit‚ pro-fit‚ and tall fit styles have different measurements and cuts for mens t shirts with varying lengths and widths to suit individual preferences easily always.

Choosing the Correct T Shirt Size Based on Body Measurements

To choose the correct t shirt size‚ it is essential to take accurate body measurements‚ including chest and waist circumference‚ and compare them to the size chart.
The size chart provides a guide to help determine the best fit based on individual body measurements.
Using a flexible measuring tape‚ measure around the fullest part of the chest and the narrowest part of the waist to get the most accurate measurements.
Then‚ compare these measurements to the size chart to determine the corresponding t shirt size.
It is also important to consider the fit style‚ such as classic‚ pro-fit‚ or tall fit‚ when selecting a t shirt size.
By taking the time to measure and compare‚ individuals can ensure a comfortable and flattering fit.
The correct size will depend on personal preference‚ with some opting for a looser or tighter fit.
Ultimately‚ choosing the correct t shirt size based on body measurements ensures a great fit and comfort.
This process helps to avoid returns and exchanges‚ making online shopping easier and more convenient.
Measurements and size charts are available online for easy reference and comparison.

Interpreting Size Charts from Different Brands

Size charts vary between brands‚ requiring a review of each brand’s measurements to ensure accurate sizing and a comfortable fit for mens t shirts online easily always.

Considering Variations in Sizing Between Brands

When shopping for mens t shirts‚ it is essential to consider variations in sizing between brands‚ as each brand may have its own unique measurement guidelines and size charts.
This can make it challenging to determine the correct size‚ especially when shopping online.
To ensure a comfortable fit‚ it is crucial to review the size chart for each brand and take note of any variations in measurements.

Some brands may offer a more relaxed fit‚ while others may have a slimmer cut.
By considering these variations‚ individuals can make informed purchasing decisions and find the perfect fit for their mens t shirts.
Additionally‚ understanding the differences in sizing between brands can help to avoid common fitting issues‚ such as sleeves that are too short or a chest that is too tight.
Overall‚ being aware of sizing variations between brands is vital for finding the ideal mens t shirt.

Finalizing Your T Shirt Size Selection

Finalize your t shirt size selection by comparing measurements and size charts to ensure a perfect fit for your body type and preferred style easily online now.

Using the Size Chart to Make an Informed Purchase Decision

To make an informed purchase decision‚ it is essential to use the size chart effectively. The size chart provides a guide to help you determine the best fit for your body type. By comparing your measurements to the size chart‚ you can ensure that you select the correct size. This is particularly important when shopping online‚ as you cannot try on the garment before making a purchase. Using the size chart can help you avoid the hassle of returns and exchanges. It is also important to consider the style and cut of the garment‚ as this can affect the fit. By taking the time to review the size chart and consider your options‚ you can make a confident and informed purchase decision. This will help you find the perfect fit and ensure that you are happy with your purchase.